Så mitt ibland jobbet med Potterthon (snart halvvägs klar med introt nu) och brödföde-källan kallad GoExcellent så snubblade man in i produktionen av en minimalistisk video till Jazz-bandet Klabbes Bank. I stort sett klippt på Robert Singletons bärbara dator och sedan fick vi lov att shot för shot återskapa och finputsa klippningen med rå-filerna (Roberts dator orkade inte med HD-filerna från Panasonic-kameran). Mången ord dryftades om huruvida vi skulle gå vidare och göra ännu mer finlir, men den lite råa känslan föredrogs och med deadline hängande över huvudet så var vi ändå ganska nöjda.
Så slå en kik på PSL där videon just nu finns som exklusivt material. Jag ska embedda den här sen när vi kan visa via vanlig youtube och vimeo också…
Då jag inser varför jag sällan är framför kameran… inte för att jag tycker ser fördjävlig ut… utan mer för att jag inte kan hålla en hel mening i huvudet…
Rottweiler var en kortfilm jag åkte ner till stockholm för att fota förra vintern. Jag fotade nog allt utom den inledande steady-cam-åkningen. Det var snabba puckar hela vägen och efter att dom gradeat alltihop och jag arbetat lite på effekter så ser den ju ganska hyffsad ut.
Regi: Joakim Hammond
Jag har planerat att göra iordning VFX-breakdowns… så det kommer så småningom.
I’ve been shooting video with my 7D ever since I got one from the Marianne-shoot. But as with most people, there are a few things that have always bothered me with Canons stock-firmware. And it’s been ignored so far by their development team (in order to, it seems, protect their video-departments).
Enter Magic Lantern. A firmware add-on that has been releasing the full power of Canon Cameras since the first hacks of the 5DmII. As of a couple of weeks ago the 7D’s infrastructure has been deemed unhackable by the developers because of the dual Digic CPU-system employed by Canon. But then, suddenly. Seemingly from out of nowhere. A user named g3gg0 posted that he cracked the code. And now… an Alpha firmware add-on is released.
If you’re wondering why I keep calling it a firmware add-on, well. It’s because it is. In order to use it. You have to update canons firmware to v2.0.3 and then load a file-structure into your CF-card and then for each time you power up the camera, you go into the menu and do the update again with the modified .fir file. This won’t actually write anything new to the cameras firmware-flash-memory. Instead it’s just a way for ML to launch it’s code into RAM. For more details about that… look up the site: http://www.magiclantern.fm/whats-new/104-releases/140-first-7d-alpha-released
Why am I excited? Well. Because, even while it is a limited feature release. It still has two of the main draws for me of the ML features. 1: Custom Crop-Marks and 2: Live View Contrast and Saturation adjustments.
I’ll explain:
Custom Cropmarks. I love Cinemascope in all it’s forms. From the anamorphic origins on 35mm 4 perf film to the not so distortion-heavy simple Techniscope and Super35 crops. But shooting for a scope crop in mind has been quite a hassle. There are some workarounds. I have tried taping scotch-tape onto the display to mask out the top and bottom. But that backfires when playing back since the playback is off-set vertically from the recording. And another aproximation is to use the 4×4 grid, since it’s rather close to what a Scope-cropmark would be. But it disappears when recording and doesn’t show at all at playback. In other words… useless.
Then I installed Magic Lantern. It has the ability to load custom BMP files as cropmarks. And while the ones provided did have Scope variations. I wasn’t all happy with how they were made. Luckily at ML there’s guides how to make functional BMP-files yourself and following those guides I made a set of crop-marks that has solid blacks outside of what I want to frame. This lets me concentrate fully on what I’m filming and ignore everything outside of it. Because I’ll just crop it out later.
Added bonus: In the menu there’s the ability to show the cropmark in playback. I’m so happy! And it’s properly adjusted to match up with the playbacks vertical offset too! Wee!
I have however noticed that a few times. The cropmark won’t go back to proper vertical position when switched back to recording mode. But re-launching the cropmark usually remedies this.
Live View Contrast and Saturation Adjustments Since a lot of us are shooting with Technicolors Cinestyle PictureStyle or other super-flat versions. A good preview of what the final image will look like is sometimes a hard job to do mentally. One workaround so far has been to have a second picture style set up that looks like a graded image and then switch to CineStyle manually before recording. While this works. It does create an opportunity for errors if you forget to switch styles. And you don’t get to see the contrasty image when recording
So in ML there’s a feature that allows us to adjust the contrast and saturation of the live-view feed. This means that we’ll get to see the image with more contrast and still shoot with the gradeable Cinestyle without having to switch between them all the time.
There’s also Zebras and Peaking. Though I haven’t had too much success using the Peaking in this version. I do however love the Zebra. Using the Luma-range and only showing what’s over 99% I get instant feedback of what’s blowing out.
Then there’s the Waveforms and histograms. Great features. Especially since I can even adjust it to show what channels are blowing out and how many pixels are blowing out in each channels. I keep these on constantly now.
I am not very fond of the option to hide menu-items using the menu-button. Mostly because the first dozen of times I pressed it it just went dark and things started dissapearing. Since I saw no indication that this was the intended behavior I was ready to report it as a bug. But I saw the tiny text. I still accidentally press it. But at least, now I know what it’s doing. I don’t like it. But according to the replies in the ML-forum they’re keeping this function.
Also. I think that it’s very confusing of them to sometimes use SET to enter sub-menus and sometimes I have to use Q-Menu (also making me accidentally hit Menu some more) for the same deal when it only shuts of the feature instead of letting me adjust it. Again. Judging from the ML-forum. This is unlikely to change. And I guess I’ll just have to live with it and relearn my button-habits for each and every menu item.
I might be sounding negative about those aspects. But overall I love this release! 😀 It’s not perfect… no… and it’ll improve greatly when they enable ML to load automatically during bootup. What are you waiting for?! Get it! (though remember that it probably isn’t covered in warranties).
As I mentioned earlier. I have been not just a tiny bit impressed with what the NEAT denoiser can do for video. And looking through some footage I had in the archives I decided to see what I could do to make the, in many ways horribly shot, footage look a bit nicer. And the choice finally fell upon a clip I had shot almost at midnight here in the jamtlandish forest while a team from SyFy where here to try to find our own little loch ness monster.
It’s in the land of the midnight sun, but still, I had only the f3.6-f6.5 zoom-lens and of course, the people where sitting in the shadow to not interfere with the filming that took place all around. So, since I have sworn to the allmighty noodily lord and his midgits that I would never use any shutter wider than 180 degrees I ended up shooting with very high ISO-gain on the 7D-sensor. And also, of course, the Technicolor CineStyle picture-style was brand-spanking-new so I was trying out that too.
All this meaning some great noise. 🙂
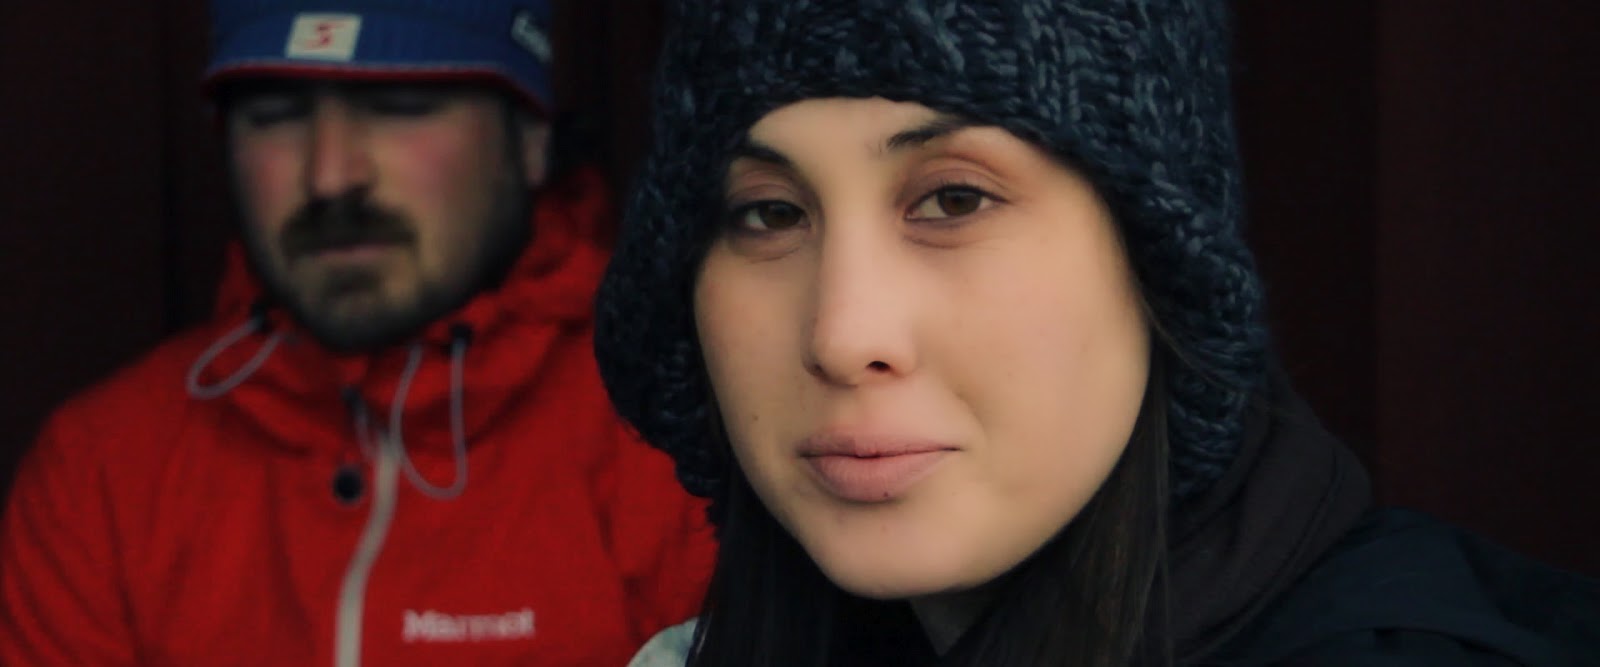
Anways… This is what I started out with.
Might not look so bad. But then again. Cropping to scope does tend to make most videos more cinematic, regardless of content (sarcasm). But nontheless. There are some pretty big issues abound in the image that even me with my simplistic monitor can spot.
First off. She’s blue… almost purple. And while there are a lot of Navi-fans out there I doubt they are enough to warrant me leaving her looking like an alien. So I had to focus on getting the skin-tones right. So after giving it the simple Neat-video with my noise-profile I had lying around and a slight sharpening on the Luminance I set to work.
The difference is slight. But if you pull it up to bigger view you will see that there’s some serious noise in the raw pic’s red jacket and in the image overall. And if I don’t pull out that noise right now it will only look worse when I’m pushing the colors around. As I will be doing rather severely.
So I drop in my trusty Colorista II and in the primary I simply ctrl-pick a part of the jackets white part as white-balance. That’s it. For starters I just want it neutralized. This was the “color-correction” bit of the process. Now let’s get “artistic”.
Since the skintones has actually started to look like skin with the simple adjustment I go in and do a simple warm-highlights and cool shadows-type of look in the master-section of Colorista.
Oddly enough. I rarely do this by actually touching the wheel for “shadows”. Because that tends to darken down the shadows far too much and tint the whole shot in the wrong way. Instead I go for the midtones. And I know this sounds crazy. Since this is where skintones is supposed to live. But if you look at the talent. Her skin is actually probably already some of the brightest parts of the image. Sometimes this reverse-tactic does backfire. But the result is still a standard push-pull to get it to look great. And while I’m at it I go into the curve-editor to bring in a custom contrast-curve.
A lot better. But still. Let’s do what I’ve been told women spend a lot of their time doing when they expect to be seen by a lot of people. I myself don’t think it’s always necessary. But hey. I’m practicing a little hollywood-style right now, so let’s go a bit shallow with what’s considered beautiful. Just for practice… ok.
So here’s where I found de-noising to really help out while grading. For comparison I took two screen-shots of using the same key sample-area on the same footage with and without the de-noising beforehand:
Now, while the un-de-noised version is useable if you do some blurring of the key it does feel rather wasteful and you are loosing a bit of definition of the edges in the process. So in my mind the denoised one is a clear winner. But then in this example I did end up blurring it allthewhile but I hope you see the potential here.
So back on topic here. Using a rather wide sample of the skin I got a nice key and went ahead to warm it up a bit further while also adding in a negative pop to even out her skin a bit and topping it off with a slight rasing in exposure. Since the key keeps the negative pop and warming where it should be without interfering with the details in the eyes and lips, I can be a bit agressive with those adjustments. -55 on the pop is probably a bit heavy-handed. But heh… it it’s already rendered… So what am I supposed to do? And it doesn’t seem to bother the guy in the back even.
(adding a negative doesn’t that result in zero?!)
Then, I felt rather done with her. But the red jacket in the background did feel a bit obtrusive. So on a second adjustment-layer I added another colorista and went into its secondary keyer. Sampled the red jacket. And just pulled down its saturation and brightness a bit.
And while I was just about to call it done I found myself looking at the lips. And I wondered. Could I maybe do digital lipstick? It sounded a bit off. But I’m not one to shy away from what’s supposed to be stupid. So I simply added another adjustment layer and another colorista. This time with a big power-mask (the first time I used the powermask-feature in this “project”) over the lip-area. A simple key and color-adjustment later and suddenly she had a not too tasteless adding of lip-pigmentation (anyone who’s actually knowledgeable about makeup probably disagrees with my wording and estethics. But at least I tried. 🙂 )
So in closing, don’t let me forget what the title was. Because now I’ve gone from this:
To this:
Without it ending up looking like this:
The difference might be slight. And probably even neglibe on the web as youtube and such. But trust me, in motion. You will be glad to not see that noise dance around, distracting you eyes from what’s important in the scene (I spent two hours in Oldenburg looking at grain-structure btw. It was booooooring… and the film wasn’t great either).
Jahapp. Medan alla andra var ute och söp skallen av sig kände jag mig riktigt helylle när jag åkte ut på gården för att fira midsommarafton. Vi tog en extra sväng för att jag ville hämta kameran och med finfint väder samt lite tur gavs det möjligheter att få ta riktigt fina bilder. Lite lätt redigerat med photoshop.
Märk väl förresten att det jag föredrar skarpt och rena linser… (inget j****a instagram här inte… för i h****e)
Svettig dag idag. Men Planet B-videon jag nyligen nämnde gick riktigt bra och vi fick visa den två gånger för samma publik på samma duk.
Nu har Robert Singleton laddat upp videon på youtube. Musikanten Erik Wennergren har lagt ut musiken på spotify och itunes.Direkta länkar dit kan jag inte just nu hitta… jag är lite utanför den “hippa” musikvärlden… har varken itunes eller spotify. Men släng gärna in länk i kommentarfält så lägger jag upp det också här i inlägget.
Tänkte bara lite snabbt skvallra om ett par projekt som är på gång att bli klara här. Dels en kortfilm jag fotat åt en herr Joakim Hammond. Och dels en musikvideo där jag skötte kamera på inspelning och färdigställer nu i dessa stunder efterarbetet inför premiär på onsdag nere på Folkets Bio Regina här i östersund.
Rottweiler
Kortfilmen är en ganska simpel historia som han, regissören mest ville köra som en kul grej. Men det växte och blev slutprojektet. Till den fick jag erfara hur RED-One faktiskt fungerar i praktiken. Och, ska jag vara ärlig. Om man inte ska re-framea i efterarbetet och behöver extra-upplösningen, då vetetusan om jag skulle bry mig om krånglet som den kameran innebar. Visst, den reella upplösningen i optimala situationer överskrider på långa vägar min egna 7D. Men jag slogs också över hur brusig bilden var redan vid, vad jag själv kallar låga ISO-värden… alltså, strax över 800. Det blev snyggt, ja. Men jag är tveksam till att 7D’n skulle ge så mycket sämre bild i samma situation. Och med 7D’n har jag inte haft problem alls med krascher mitt i tagning. Glödhet kamerakropp och allmänt extremt meck för att ens få den startklar.
Planet B
Musikvideon var mera av en slump att jag kom in i. Regissören Robert Singleton bjöd in vänner och bekanta för musikvideoinspelning under frösöbron. Efter lite snack kom han fram till att han ville ha vidare vinkel än hans Micro4/3 med 14mm lins kunde erbjuda. Min 7D med 11mm linsen blev då weapon of choice.Så under inspelning fungerade jag lite som DIT och såg till att själva kameratekniken var så lite problematisk som möjligt samt kontrollerade att inställningarna gav en användbar bild allteftersom tiden fortskred och uppsättningen för den långa tagningen flyttades allt längre fram på inspelningsdagen.Många saker skulle klaffa, men det var ingen fara på det taket. Två tagningar i slutänden och vi var klara.
Inspelad med ISO 400 och f11 på bländaren för att få tillräckligt skärpedjup. Gick tillochmed och slog på Highlight Priority och körde Neutral Picture Style enligt Prolosts rekommendationer (han skulle nog dock avråda från HP) Alldeles galet alltså enligt gängse traditioner om vad som är “filmlook”, men ok. Jag kompenserade lite för det genom att ha en ganska agressiv orange-blå grading. 😉 Vi får se hur det här slutar. Men jag tror den blir riktigt snygg efter att ha brusreducerat den och gjort första genomgången med färgkorr och grading.
TsuDuKu…
Men hur dessa två projekt barkar i slutändan får vi inte veta förrän onsdag för musikvideon och nästa vecka för kortfilmen. Jag återkommer då med ordentligt med bildexempel på hur saker gjorts och tankar bakom de olika stegen.
Om bara några minuter så går långfilmen Marianne upp på SVT2. Och med det har den rört i princip alla sätt att se film jag kan komma på… förutom BluRay och VoD… men det lär väl ändras det också.
Förresten är jag inte så säker på VoD heller… Men jag hoppas så många som möjligt ser filmen. Jag ska ju ha vinstdelning ändå. 😉


